In the last few entries on creating a containerized Minecraft server, we created the container, launched the server, moved data to a volume, created regular backups of our world, took a look at customizing the server’s properties, and updated changes to the container. Right now, our setup is pretty solid! So, let’s get to that fun and impractical thing I mentioned that we’d be doing with Kubernetes.
Lego® representation of a Minecraft mooshroom in a mushroom biome
What we want to build
This has been something that I’ve wanted to build for a while now, especially as I’ve become bored with my existing world(s). I thought that it would be awesome to create a way to join a random Minecraft world, with different players and different seeds. For obvious reasons, I’ve nicknamed this concept Minecraft Roulette.
So, what does this entail?
From the user’s side of things, they should simply access their server the same way as always: through their client. However, with Minecraft Roulette, this will instead drop the user into a random world (of say, three possible worlds), with different resources and levels. The trick is that the user will simply be able to fire up the client and use the same server entry as before to join the server.
Now, if you’ve ever tried to join a server with mismatched mods, you’ll know that the client really hates that. So, for ease of use reasons, we’ll impose the restriction that all servers should be running the same set of mods (though it would be really cool if we could join arbitrary servers with arbitrary mod packs and have it just work).
Inviting Kubernetes (k8s) to the Minecraft party
How are we going to do this? Well, we already have the Minecraft container, updated with our preferences, and with externalized storage. So all we need is a way to orchestrate the different components, and Kubernetes (often abbreviated as k8s) is a perfect fit.
Kubernetes is an open source container cluster manager (disclosure: started at Google, but is now owned by the Cloud Native Computing Foundation). Given a set of containers and declarations, Kubernetes will schedule the containers on nodes in a cluster to fulfill the desired state. Additionally, it will ensure that the cluster continues to meet the desired state, and that means that it takes responsibility for healing the cluster in the event of failure.
We’ll be using Kubernetes with Google Compute Engine, but Kubernetes also works with other environments such as Azure, Rackspace, and AWS, to name a few.
Let’s get started!
Getting started with Kubernetes
First off, we need to set up Kubernetes. Now, there are two separate entry points when learning about Kubernetes:
- Contributor-facing documentation on GitHub
- User-facing documentation on kubernetes.io
While it’s worthwhile to dig through the contributor documentation, and if you’re curious about the technical underpinnings behind Kubernetes it’s definitely the way to go, for our purposes we actually will be just fine referencing the user documentation alone.
Install binary
Before we install Kubernetes locally, we need to update gcloud and confirm that we’ve set our default project ID:
local $ gcloud components update
local $ gcloud config list
\[compute\]
zone = us-central1-f
\[container\]
cluster = todo
\[core\]
account = <your email address>
disable\_usage\_reporting = False
project = <project id>
\[meta\]
active_config = default
If it’s not set, go ahead and set it:
local $ gcloud config set project <project id>
Now, we can proceed to set up Kubernetes. First, we need to get the latest release version (as of writing this entry, the release is v1.0.6) and extract it:
local $ curl https://goo.gl/6y01p1 -o k8s.tar.gz
local $ tar -xvf k8s.tar.gz
Test with a cluster
It’s easy to start up a cluster with Kubernetes using built-in scripts:
local $ cd kubernetes
local $ cluster/kube-up.sh
To do fun stuff with it, we need to use the Kubernetes command line tool, kubectl. kubectl lets us interact with the Kubernetes API server to manage our cluster. There are different versions of kubectl for different platforms, and they’re located in kubernetes/platforms. (You may want to alias the version of kubectl relevant to your system so that you can operate, path-free.)
Okay, we have a running cluster. We can verify this in a few different ways.
By going to the developers console and checking on our virtual machines
Using
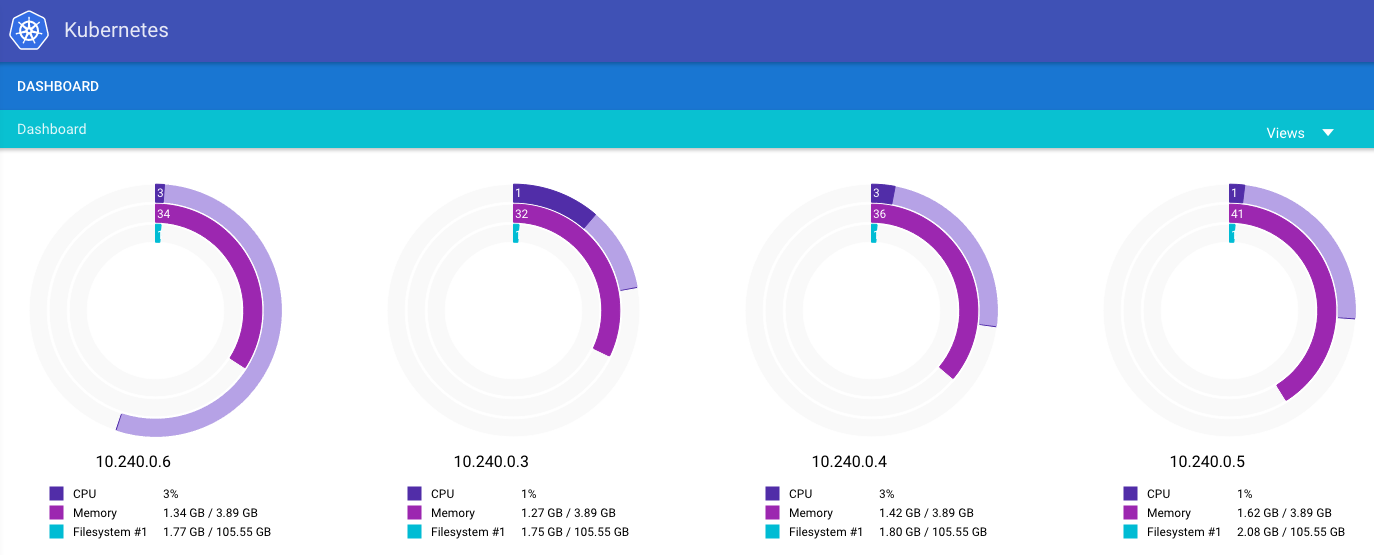
kubectlon the command line:local $ kubectl cluster-info Kubernetes master is running at https://146.148.43.166 KubeDNS is running at https://146.148.43.166/api/v1/proxy/namespaces/kube-system/services/kube-dns KubeUI is running at https://146.148.43.166/api/v1/proxy/namespaces/kube-system/services/kube-ui Grafana is running at https://146.148.43.166/api/v1/proxy/namespaces/kube-system/services/monitoring-grafana Heapster is running at https://146.148.43.166/api/v1/proxy/namespaces/kube-system/services/monitoring-heapster InfluxDB is running at https://146.148.43.166/api/v1/proxy/namespaces/kube-system/services/monitoring-influxdb8086/TCPLooking at the deployed Kubernetes UI on the master node:
Find out the password for the master node
local $ more ~/.kube/configLoad
https://<master IP>/ui, and enteradminas the username and the password from the previous step
Screenshot of the Kubernetes UI
I know what you’re thinking: “that’s it?” Well, yes and no. Our cluster is running, but we’re not actually running anything besides some housekeeping systems. We can verify that by introspecting into the cluster:
local $ kubectl get nodes
NAME LABELS STATUS
kubernetes-minion-2lmq kubernetes.io/hostname=kubernetes-minion-2lmq Ready
kubernetes-minion-bh4z kubernetes.io/hostname=kubernetes-minion-bh4z Ready
kubernetes-minion-llj2 kubernetes.io/hostname=kubernetes-minion-llj2 Ready
kubernetes-minion-ohja kubernetes.io/hostname=kubernetes-minion-ohja Ready
...
Pods: (2 in total)
Namespace Name
kube-system fluentd-cloud-logging-kubernetes-minion-2lmq
kube-system monitoring-heapster-v6-9ww11
...
How do we orchestrate our containerized Minecraft servers on this cluster, now that it’s running?
Defining the components of Minecraft Roulette
Let’s think about it for a minute. Breaking it down, we don’t actually need very much for this to work. We need a bunch of Minecraft servers up and running, and a single point of entry for players. These servers must operate with the same sets of mods and run the same version of Minecraft, but use a different seed and have different player data (okay, having a different seed isn’t actually a requirement, but as we’re not presetting it, it likely will be different).
It’ll look pretty much like this.
Animation of Minecraft Roulette
Pods here, pods there
Kubernetes, like any new technology, has its own set of terms. The most basic of which is the concept of a pod. Pods are a group of containers, or a standalone container, that functions as a unit. For example, a web server might be a standalone pod. A more complex example might be a web server and a data-only container that function together as a pod.
We will have a fairly simple pod. We’ll have one container in our pod: the Minecraft server. To define the pod, we specify it in minecraft-server.yaml:
apiVersion: v1
kind: Pod
metadata:
  labels:
    name: minecraft-server
  name: minecraft-server
spec:
  containers:
  - name: minecraft-server
    image: gcr.io/<project id>/ftb:v3
    env:
    - name: EULA
      value: "true"
    ports:
    - containerPort: 25565
      hostPort: 25565
This shouldn’t look too outlandish; in fact, we can tie most everything in the yaml file back to our docker run command:
minecraft-server $ sudo docker run -p 25565:25565 \
                                   -e EULA=true \
                                   -d gcr.io/<project id>/ftb:v3
Now, we can create the pod using kubectl:
local $ kubectl create -f minecraft-server.yaml
We’ll see very little output here, but we can verify that the pod is being created / running by getting the current set of pods:
local $ kubectl get pods
NAME READY STATUS RESTARTS AGE
minecraft-server 1/1 Running 0 21m
We can find out on which node the pod is running by describing it:
local $ kubectl describe pod minecraft-server
Name: minecraft-server
Namespace: default
Image(s): gcr.io/<project id>/ftb:v3
Node: kubernetes-minion-ohja/10.240.0.5
We can see the node name, and find out the external IP to test if we can connect with the Minecraft client:
local $ gcloud compute instances list kubernetes-minion-ohja
NAME ZONE INTERNAL\_IP EXTERNAL\_IP STATUS
kubernetes-minion-ohja us-central1-b 10.240.0.5 104.197.57.89 RUNNING
Now, if we try to connect with the client, we’ll be dropped into the world. However, that’s not fully the experience we want. So next, we’ll create a service that acts as a load balancer across all the minecraft-server pods.
Creating a load balancer service
Services are a concept in Kubernetes that enables us to address a group of pods at once. That’s pretty much it. How does it determine which pods to address? By using the label that we defined in the pod specification above. Using this label selector, we can target any number of pods simultaneously while still allowing flexibility; we can compose labels in order to form complex queries on the pods in our Kubernetes cluster.
While we can use services for any number of purposes, for Minecraft Roulette our service will act as a load balancer. This service definition looks much like pod definition. Let’s create the minecraft-service.yaml spec:
apiVersion: v1
kind: Service
metadata:
  labels:
    name: minecraft-lb
  name: minecraft-lb
spec:
  ports:
  - port: 25565
    targetPort: 25565
  selector:
    name: minecraft-server
  type: LoadBalancer
We’ve given the service some metadata, port mapping, told it to operate on the selector of minecraft-server which maps to the metadata from minecraft-server.yaml, and specified that it should act as a load balancer. Now, we can create the service:
local $ kubectl create -f minecraft-service.yaml
Like before, we can query the services on the cluster:
local $ kubectl get services
It may take a minute, but we should see two IPs under the minecraft-lb entry: one is the internal IP and the other is the publicly addressable IP address.
NAME LABELS SELECTOR IP(S) PORT(S)
...
minecraft-lb name=minecraft-lb name=minecraft-server 10.0.195.201 25565/TCP
104.197.10.242
That second IP address is what we can put into our Minecraft client to join a world. Try it out – but remember to keep the port!
Increasing the number of worlds with a replication controller
However, right now it’s a roulette of one, as we only have one pod running. Let’s change that!
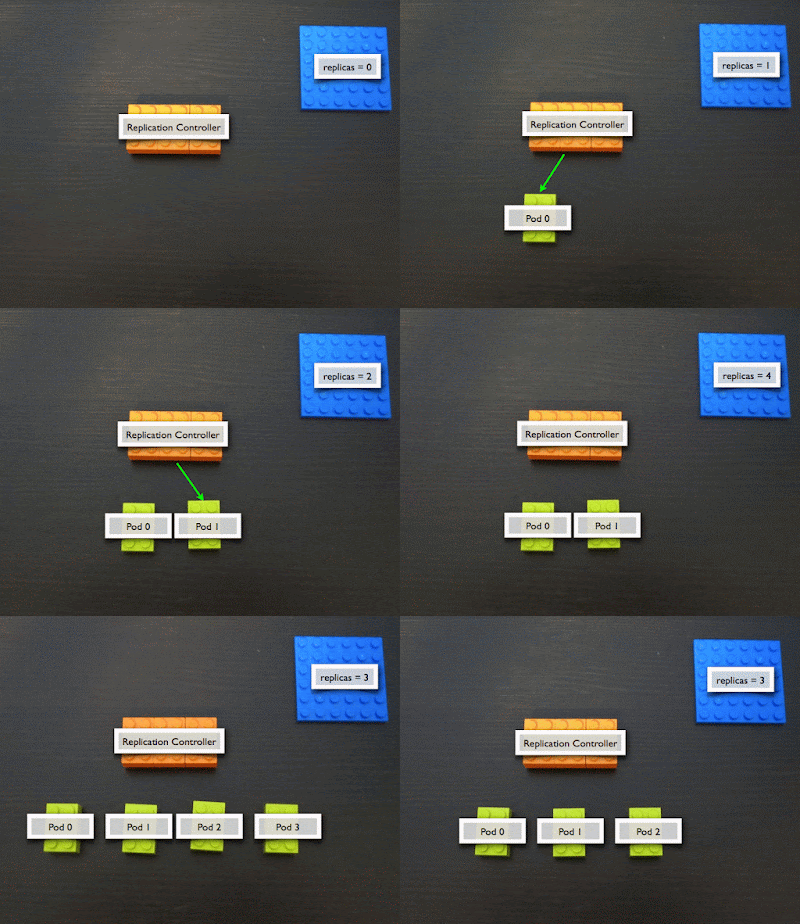
To do that, we’ll need another Kubernetes concept: the replication controller. It does exactly what it sounds like; it controls how many replicas of a given pod are running at the same time. We can think of it as an infinite loop that keeps checking to make sure that there are the specified number of replicas running, and if there are too many or too few, it will kill or create pods to make sure expectation matches reality.
Example animation of of a replication controller cycle
To create our replication controller, we need to specify a few things: how many replicas of the minecraft server pod it should keep running, the selector, and the template of the pod. A good question to ask here is “didn’t we already create the pod template in minecraft-server.yaml?” Well, yes, we did. There’s an open issue to be able to reference external pod definitions, but for now we’ll have to merge the replication controller and pod definitions.
First off, delete the existing pod definition:
local $ kubectl delete -f minecraft-server.yaml
Then, create minecraft-rc.yaml and define the replication controller as having three replicas, and the same pod definition from above:
apiVersion: v1
kind: ReplicationController
metadata:
  name: minecraft-rc
  labels:
    name: minecraft-rc
spec:
  replicas: 3
  selector:
    name: minecraft-server
  template:
    metadata:
      labels:
        name: minecraft-server
      name: minecraft-server
    spec:
      containers:
      - name: minecraft-server
        image: gcr.io/<project id>/ftb:v3
        env:
        - name: EULA
          value: "true"
        ports:
        - containerPort: 25565
          hostPort: 25565
Once that’s saved, tell kubectl to enact it:
local $ kubectl create -f minecraft-rc.yaml
Behind the scenes, the requisite number of pods are being started by the replication controller, and we can verify that:
local $ kubectl get pods
NAME READY STATUS RESTARTS AGE
minecraft-rc-4upzy 1/1 Running 0 1h
minecraft-rc-hyy4h 1/1 Running 0 1h
minecraft-rc-i5m98 1/1 Running 0 1h
Now we have not one, but three pods behind that load balancer. Incoming requests will be distributed to one of the three pods monitored and maintained by the replication controller that we just created.
Testing it out
We have the IP address of the load balancer in our Minecraft client from the services section, so it’s all set and ready to go. Try joining several times; we should see different worlds every once in a while. Note: we may see the same world in a row, even though three different worlds are running.
World 1
World 2
World 3
Killing off a pod
As we stated above, the replication controller ensures that we always have three minecraft-server pods running, but let’s see it in action. Try killing a pod with kubectl:
local $ kubectl get pods
NAME READY STATUS RESTARTS AGE
minecraft-rc-4upzy 1/1 Running 0 17h
minecraft-rc-hyy4h 1/1 Running 0 17h
minecraft-rc-i5m98 1/1 Running 0 17h
local $ kubectl delete pod minecraft-rc-4upzy
Now if we query the current pods, we get:
NAME READY STATUS RESTARTS AGE
minecraft-rc-a045y 0/1 Pending 0 7s
minecraft-rc-hyy4h 1/1 Running 0 17h
minecraft-rc-i5m98 1/1 Running 0 17h
We can see that the first pod in the list has only just been started by the replication controller in order to make sure that we have three pods running.
Scaling up and down
Let’s say that Minecraft Roulette is astonishingly popular, but people are complaining about the limited number of worlds they can join. How do we scale it up to have more worlds? We have a couple of options. We can update minecraft-rc.yaml and do a kubectl rolling-update, or we can just use kubectl:
local $ kubectl scale --replicas=4 replicationcontrollers minecraft-rc
local $ kubectl get pods
NAME READY STATUS RESTARTS AGE
minecraft-rc-81lbx 0/1 Pending 0 7s
minecraft-rc-a045y 1/1 Running 0 16m
minecraft-rc-hyy4h 1/1 Running 0 17h
minecraft-rc-i5m98 1/1 Running 0 17h
Basically, the kubectl scale command takes any actions necessary – creating or deleting – to scale up or down.
That’s all, folks
Whew! While this may have seemed like a lot, our end result was two yaml files, a bunch of kubectl commands, and a fully functional Minecraft Roulette cluster. Let’s recap everything we did in this series:
- Containerized Minecraft and ran it on a Compute Engine container-optimized image
- Figured out how to use persistent storage to save and backup the world files
- Customized the server.properties file and learned how to update the Minecraft image
- Learned how to use Kubernetes to build an application that connects people to a random world (you are here)
Lego® Minecraft player eating cookies in a boat, for some reason
That just about wraps up this series. I’m going to return to playing Minecraft for fun!
You can see the files we used in this blog entry on GitHub.


