Getting a computer to see and understand stuff is hard. Way hard. Like, hard for a long time. For a bit of context, slide 15 seems to be the definitive abbreviated history, dating all the way back to 1966. If you want to dig into the details, there’s a free Udacity course on computer vision offered by Georgia Tech.
However, you can add computer vision and intelligence capabilities to your applications without the deep understanding of machine learning by using Google Cloud Vision. The Vision API lets you send across an image, along with instructions of what you’re looking to find, and will return what it “sees” in your image. You can look for labels, logos, landmarks, along with other things that don’t start with the letter “l”. If you’re processing images that include people, you can look for faces or detect sentiment.
My first project with the Vision API is quite simple: let people text an image, and receive a reply with up to three things that the API detects in it.
What’s that?!
Let’s call this little project What’s that?!. Now, the concept is really simple.
Get MMS → Query Vision API with image → Send SMS with response

Lego® representation of What’s That?!
If you haven’t been living under a rock for the last eight years, you’ll immediately conclude that we’ll be using Twilio for the telephony part of things. The title may also have given it away, I suppose. After going through their Python tutorial, I didn’t really see a reason to deviate from using Flask; it’s lightweight, intuitive, and doesn’t add a ton of intellectual overhead to the project.
Setup
For this, you will need:
- A Google Cloud Platform project with the Vision API enabled
- A server with Python installed (I used Google Compute Engine)
- gcloud installed and set up with your Vision-enabled project on your server (if you use a Compute Engine instance, this happens automagically)
- The following packages installed on your server:
- google-api-python-client>=1.3.2
- Flask>=0.8
- twilio>=3.3.6
- A Twilio account and number enabled to receive and send MMS and SMS
Creating the server
For the server, I’ll be using a Google Compute Engine instance. For more information on how to create an instance, check out the docs. We don’t need any special options, but you will need to expose the instance to the web and add a firewall rule (sneak peak: Flask’s default is port 5000, so add tcp:5000 as the value for Allowed protocols/ports).
Now, you can install your favorite editor and edit directly on the instance, use gsutil to push files back and forth, install git to clone the whole Vision samples repository, or whatever. At the end of the day, you’ll need a way to get the code to run the server on your instance. Go ahead, SSH into it, and do whatever you need to do. Just make sure that you’ve installed the packages in step (4) and have configured them correctly.
Initial Flask & Twilio template
Let’s start with a shell of a template in a file we’ll call whats_that.py:
# Flask / Twilio reqs
from flask import Flask, request, redirect
import twilio.twiml

# GCP Vision reqs
import base64
import httplib2
from googleapiclient import discovery
from oauth2client.client import GoogleCredentials

# App reqs
import requests
from random import randint

app = Flask(__name__)

@app.route("/", methods=\['GET', 'POST'\])
def receive_message():
    return "Hello from what's that?!"

if __name__ == "__main__":

    # Change to app.run() for a local server
    # By default runs on port 5000
    app.run(host='0.0.0.0')
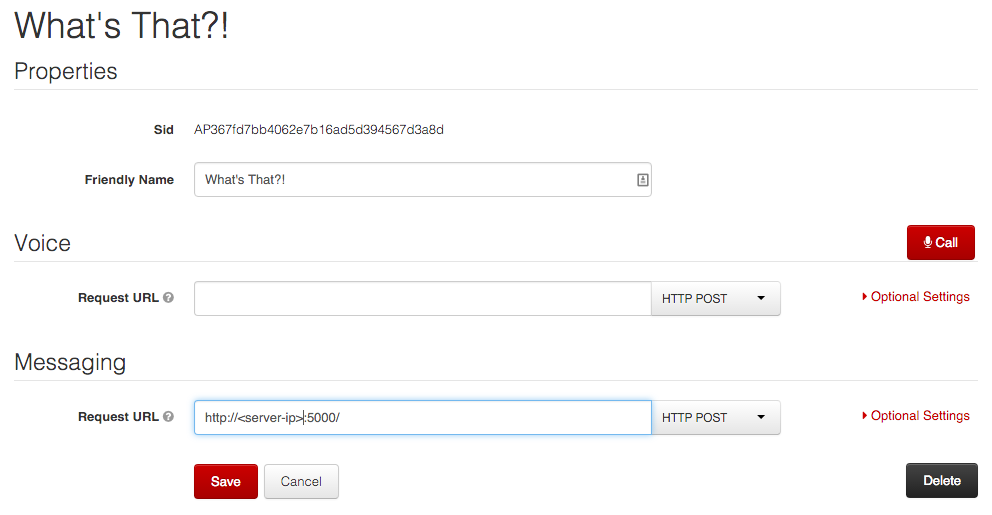
Now, we have to let Twilio know where your server is:
Select the phone number you’re using for this demo
Scroll down to “Messaging” and select “TwiML App”
Create a new TwiML App

Give it a name and configure the “Messaging” section
In the “Request URL” field, enter the address of the server:
<server-ip>:5000Make sure that it’s still set to
HTTP POST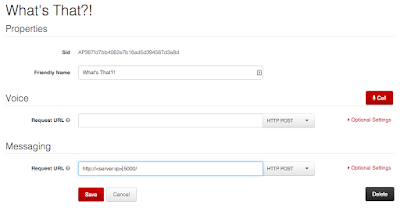
Save it!

Now, start the server with:
server $ python whats_that.py
Then, text something – anything – to the number you set up with Twilio. You should get the response “Hello from what’s that?!” texted back!
Well, that was easy. Now, it’s time to add in some more code to extract the image that we want to process from the MMS.
Receiving & parsing out images
What we’re going to do is process the message, get the first valid image attached to it, and then start to construct a custom-ish response. First, you’ll add in some code to see if there are any attachments in the request, starting to fill out the receive_message function:
@app.route("/", methods=['GET', 'POST'])
def receive_message():

    # Go through and process attachments
    for i in range(int(request.values.get('NumMedia', None))):

        media_content_type = request.values.get('MediaContentType%i' % i, None)

    return "Hello from what's that?!"
This will figure out what type of content is attached to the message. But, you need to determine if you have an image to process. So, you’ll first define some acceptable content types:
ACCEPTABLE_FILE_TYPES = ["image/jpeg", "image/png", "image/jpg"]
Then, use that list of types to check the attachments in receive_messsage. What that gives you is media_url, the URL that you can use to access the image attachment. With that, you can fetch the image to use with the Vision API. You’ll want to find the first image that you can use, and disregard the rest:
# -- snip! --

    media_content_type = request.values.get('MediaContentType%i' % i, None)

    # First, check to see if we can use the attachment
    if media_content_type in ACCEPTABLE_FILE_TYPES:

        # Go get the image
	media_url = request.values.get(i, None)

        image = requests.get(media_url).content

        # We're only looking at the first image
	break

# -- snip! --
Cool. You received the message, pulled out the first image, and are currently replying with an acknowledgement text. Let’s move on to using the image with the Google Cloud Vision API.
Querying the Vision API
The Google Cloud Vision API lets you send over an image and what you’re looking to find. How does it do this? It works with pre-trained models developed by Google for these purposes. There’s a face detection model, a logo detection model, a text detection (OCR) model, and others. Because these models have already been trained, all you have to do is ask it a question.
Your question will be: “Hey Vision API, what (labels) do you see in this image?”
To do this, write a new function, get_labels. First, you’ll authenticate. This assumes that you’re running the server in an environment that’s authenticated with gcloud:
DISCOVERY_URL = 'https://{api}.googleapis.com/$discovery/rest?version={apiVersion}'


def get_labels(image, num_retries=3, max_results=3):

    labels = ""

    # Set up the service that can access the API
    http = httplib2.Http()
    credentials = GoogleCredentials.get_application_default().create_scoped(
        ['https://www.googleapis.com/auth/cloud-platform'])
    credentials.authorize(http)
    service = discovery.build('vision', 'v1alpha1', http=http,
			                 discoveryServiceUrl=DISCOVERY_URL)
Then, you’ll encode the image and build the JSON payload:
# Prepare the image for the API
    image_content = base64.b64encode(image)

    # Construct the request
    service_request = service.images().annotate(
        body={
            'requests': [{
                'image': {
                    'content': image_content
	            },
	            'features': [{
                    'type': 'LABEL_DETECTION',
                    'maxResults': max_results,
                }]
            }]
        })
Finally, query the API with your payload, and extract any responses:
# Send it off to the API
    response = service_request.execute(num_retries=num_retries)
    if('responses' in response and
            'labelAnnotations' in response['responses'][0]):
        labels = response['responses'][0]['labelAnnotations']

        return labels
    else:
        return []
Then, add in a call to your new function in receive_message:
# -- snip! --

            image = requests.get(media_url).content

            # Query the API
            labels = get_labels(image)

            # We're only looking at the first image
            break

# -- snip! --
Awesome! Now you’ve done 80% of the work. All that’s left is sending a text message in response, telling them what the API saw.
Sending the response
Right now, you’re sending back some placeholder text. Instead, change that to use the labels we got back from the API. You’ll create another function called construct_message, iterate through the labels, add some snark, and turn them into a string:
def construct_message(labels):

    # We'll use this to construct our response
    label_desc = ""
    remarks = ['Swanky!', 'Meh.', 'Alright.', 'So what?', 'NBD.', 'Cool!']

    # Go through labels and turn them into text of the response
    for i in range(len(labels)):

        # We've got an answer! Let's tell them about it
        label_desc += '\n%s Score is %s for %s' % (remarks[randint(0, 5)],
                                                   labels[i]['score'],
                                                   labels[i]['description'])

	# Add the prefix
    resp = twilio.twiml.Response()
	resp.message(label_desc)
	return resp
Then, call your new function and use the string instead of your placeholder:
# -- snip! --

        # We're only looking at the first image
        break

    # Construct the response
    resp = construct_message(labels)

    # And it's off!
    return str(resp)

# -- snip! --
Once you redeploy your server, you’ll be ready to send some messages and test it out.


Lego® scientists series
Awesome Seattle coffee
Modern sculpture
Future fun
So, this was a fun proof-of-concept. I could see something based on this idea turning into a cool question & answer system, or travel-assist app designed to help tourists figure out what landmark they’ve found, or something more sophisticated like helping folks determine if a food item is going to trigger allergies. There could be a lot of different directions that you could take the combination of Google Cloud Vision and Twilio.
In the future, I’d like to expand this to immediately delete the images from Twilio. It’s a bit more work, and I wanted to get this out the door (any of you writing demo code understand this). The next logical step seems to be doing some intelligent analyses first and then figuring out what sort of feature to request. That way, if I screenshotted some text and sent that along, it would be able to determine that it should run OCR on it. Easy sharing of results – besides the screenshotting that I did above – would be nifty as well.
Wrap up
It’s pretty easy to get started with the Vision API. This was my first project with the Vision API, Twilio, and even with Flask, and it took me under a day to code. Now that the API is in beta, you can start using it as soon as you enable the API. Make sure you share your interesting results with it!
You can see the files we used in this blog entry on GitHub (my fork of the Vision samples).